The “Safe Haven” quest is one of the first major story missions you will undertake in Dying Light: The Beast. This multi-stage challenge is a true test of your skills, requiring you to master parkour, close-quarters combat, and environmental puzzle-solving as you fight to secure a new home for your allies.
Table of Contents
- 1.1 Preparation: Gearing Up for the Monastery Assault
- 1.1.1 Recommended Loadout
- 1.1.2 When to Start the Quest
- 1.2 The “Safe Haven” Quest Walkthrough
- 1.2.1 Step 1: Get to the Monastery
- 1.2.2 Step 2: Find Another Way Inside
- 1.2.3 Step 3: Establish a Safe Location
- 1.2.4 Step 4: The Boss Fight – How to Kill the Chimera
- 1.2.5 Step 5: The Aftermath and Debriefing
- 1.3 The Rewards
The quest is a thrilling journey that culminates in a terrifying and difficult boss battle against a brand-new and formidable special infected: the Chimera.
Successfully completing this quest is not only essential for progressing the main story but also rewards you with a crucial new safe zone that will make your exploration of the dangerous Castor Woods region much easier. This guide will provide you with a complete, step-by-step walkthrough of the entire Safe Haven quest. We’ll cover how to find the monastery, the best way to prepare for the mission, a tactical guide for clearing the infected-filled halls, and a detailed strategy for defeating the deadly Chimera.

Preparation: Gearing Up for the Monastery Assault
Before you even think about heading towards the quest marker, it is crucial that you are properly prepared. The monastery is a high-difficulty area packed with enemies, and the quest ends with a major boss fight. Going in under-equipped is a recipe for a frustrating death.
Recommended Loadout
- Weapons: A balanced loadout is key for this mission.
- Primary Melee: Bring your most powerful and durable modded melee weapon. A two-handed axe or sledgehammer with electrical or fire mods is excellent for crowd control against the regular infected you’ll find inside.
- Primary Ranged: A powerful shotgun is highly recommended. It will be invaluable for the close-quarters combat inside the monastery’s tight corridors and is extremely effective during the final boss fight.
- Secondary Ranged: A silenced pistol or a bow is useful for stealthily taking out any zombies patrolling the exterior of the monastery before you enter.
- Consumables: Stock up before you leave. A full stack of Medkits is non-negotiable. It’s also a great idea to craft and bring along several stamina and damage-boosting consumables to give you an edge during the difficult Chimera boss fight.
- Gear: As much of the mission takes place in dark interiors, make sure you have your UV Flashlight and a good supply of UV Flares as a backup.
When to Start the Quest
It is strongly advised that you begin this quest during the in-game day. The initial approach to the monastery and the search for an entrance will be much safer in the daylight. The interior of the building will be dark regardless, but starting during the day ensures you won’t have to deal with Howlers or Volatiles on your way there.
The “Safe Haven” Quest Walkthrough
Once you are fully armed and supplied, it’s time to begin your mission.
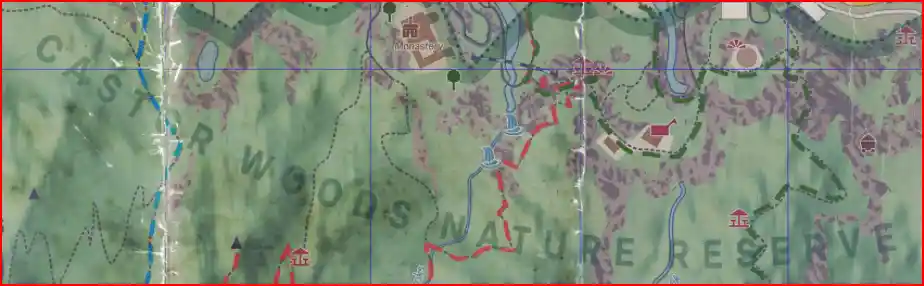
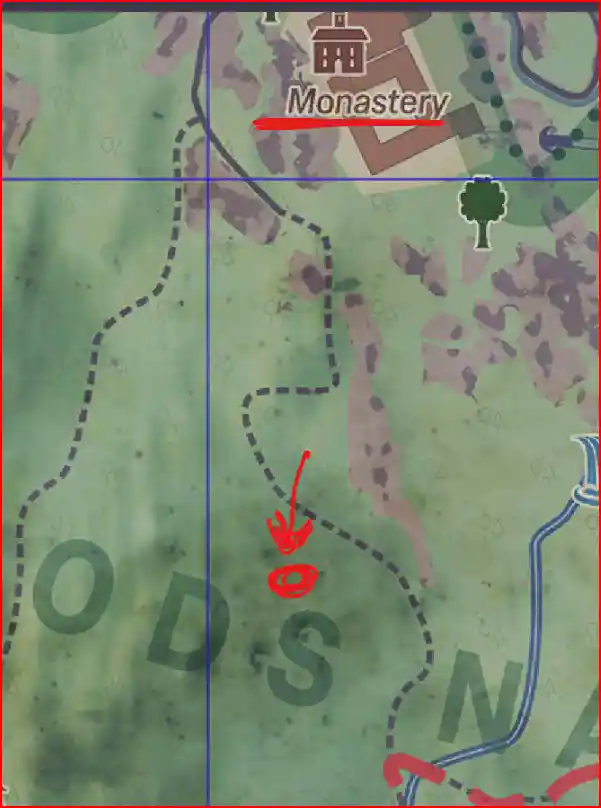
Step 1: Get to the Monastery
Your first objective is to travel to the quest’s location. As your map shows, the monastery is located deep within the Castor Woods Nature Reserve, specifically in the area known as Whispering Brooks, near Crystal Lake. Follow the main story quest marker (!) on your map to find the large, fortified structure.
Step 2: Find Another Way Inside
As you approach the monastery, you will find that the main gates are heavily barricaded and cannot be opened from the outside. You will need to use your parkour skills to find an alternate route.
Circle the perimeter of the stone building. You are looking for a section of the exterior wall that has either crumbled or is covered in scaffolding. This will provide the handholds you need to begin your ascent. You will likely need to perform a series of wall-runs and jumps to climb up to a second-story window or a hole in the roof that will grant you access to the monastery’s interior.
Step 3: Establish a Safe Location
Once you are inside, your primary objective is to clear out the infected and restore power to turn the monastery into a functioning safe zone. This is a multi-step process.
- Close the Entrance Door: Your first task is to secure the building. Fight your way through the initial rooms to the main entrance from the inside. You will find a large gate that you can close and barricade, preventing any more infected from pouring into the building while you work.
- Kill All the Infected: With the entrance sealed, you must now systematically sweep through the monastery’s main halls and sanctuary, eliminating all the biters and virals that are lurking in the darkness. The close quarters are perfect for a powerful shotgun. Be cautious, as virals can hide in dark corners and ambush you.
- Turn on the Generator: With the main area clear, you need to find the generator to restore power. The generator is located in the monastery’s dark and flooded basement. Follow the thick yellow power cables on the walls and floors to find the stairwell leading down. Be prepared for another fight, as the basement is often home to a handful of additional zombies.
- Turn on the Safe Zone Lights: After you have started the generator, follow the power cables back up to the main floor. They will lead you to a main breaker switch. Interact with it to activate the safe zone’s powerful UV lights, officially securing the area.
Step 4: The Boss Fight – How to Kill the Chimera
Be warned: the moment you restore power, you will trigger the quest’s climactic boss fight. A terrifying and massive new special infected, the Chimera, will burst through a wall into the main sanctuary, which will now serve as your boss arena.
- The Chimera’s Attacks: The Chimera is a fast and brutally powerful creature. It has a devastating leaping pounce attack that can cover huge distances, and a deadly spit attack that leaves a lingering pool of corrosive acid on the ground, which will drain your health if you stand in it.
- The Strategy: The key to this fight is to stay mobile. Do not stand still. Use the large stone pillars and wooden pews in the sanctuary as cover to dodge its leaping attacks and to block its acid spit. The best time to deal damage is in the brief recovery period just after it lands from a pounce. This is your window to get in close with a powerful shotgun for massive damage, or to land a few heavy hits with your melee weapon. Use your dodge ability to avoid its follow-up swipes, and then immediately create distance again. Whittle down its health, and don’t be afraid to use your Medkits liberally.
Step 5: The Aftermath and Debriefing
With the Chimera defeated, the combat portion of the quest is over. All that’s left is to complete the story objectives.
- Check your stash.
- Talk to your ally, Olivia.
- Take the Manual she gives you.
- Use the newly activated workbench.
- Have a final conversation with Olivia to complete the quest.
The Rewards
For successfully clearing the monastery and defeating the Chimera, you will receive a substantial set of rewards:
- 10,000 XP
- Binoculars
- 5 Lockpicks
- 500 Old World Money
You have now completed the Safe Haven quest, securing a vital new safe zone in the heart of Castor Woods and proving that you have what it takes to face the deadliest new threats in the world of Dying Light: The Beast.
- Dying Light: The Beast – The Ultimate Advanced Graphics Guide
- Dying Light: The Beast – A Complete Guide to All Safe Locations and Codes (Old Town)
- Dying Light: The Beast – A Complete Guide to All Blueprint Locations
- Dying Light: The Beast – How to Open the Locked Train Car on the Bridge
- Dying Light: The Beast – A Spoiler-Free Guide to the Main Story Achievements
- Dying Light: The Beast – The Full Story of Kyle Crane
- Dying Light: The Beast – A Complete Guide and Roadmap to All 31 Achievements