
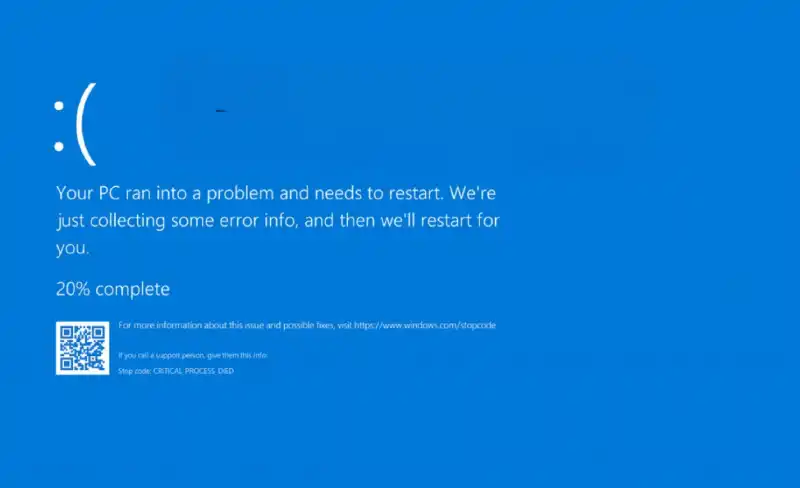
The Blue Screen of Death (BSOD) is one of the most dreaded errors a Windows user can face. It’s particularly alarming when these crashes start happening right after a recent Windows 11 update, suggesting that the update itself may have introduced an instability or conflict with your system. A post-update BSOD can make your PC unusable, but there are clear steps you can take to troubleshoot and resolve the issue.
Table of Contents
These crashes are typically caused by incompatible drivers, corrupted system files, or a bug in the update itself. The key is to identify the source of the problem and either roll back the problematic change or fix the underlying conflict. This guide will show you how to recover your system from a BSOD caused by a recent update.
⏪ Uninstall the Problematic Update
If the BSOD errors started immediately after a specific update was installed, the most direct solution is to remove that update. You can do this from the Windows Recovery Environment if you’re unable to boot into Windows normally.
To uninstall an update:
- Go to Settings > Windows Update > Update history.
- Scroll down and click on Uninstall updates.
- You will see a list of recently installed updates. Identify the latest one (look for the installation date) and click the Uninstall button next to it.
- Follow the prompts and then restart your computer.
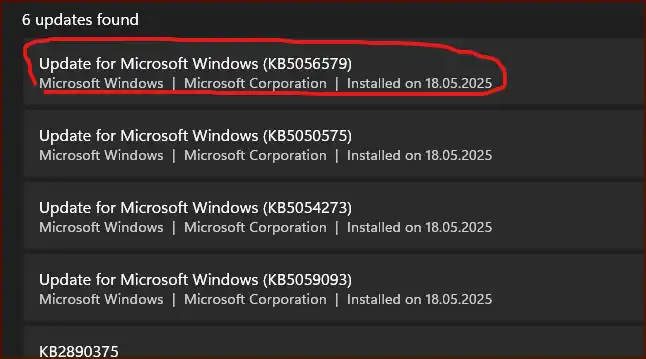
If you can’t get into Settings, you can access this same option through the Advanced Startup options (Troubleshoot > Advanced options > Uninstall Updates).
🛡️ Update Your System Drivers
A Windows update can sometimes create a conflict with older hardware drivers, especially for critical components like your graphics card, chipset, or network adapter. An incompatible driver is a very common cause of a BSOD.
You should visit the websites of your computer or component manufacturers (e.g., Dell, HP, NVIDIA, AMD, Intel) and download the latest drivers certified for Windows 11. If you recently updated a specific driver and the crashes started, you can try rolling back to the previous version through the Device Manager (find the device, right-click, select Properties, go to the Driver tab, and click Roll Back Driver).
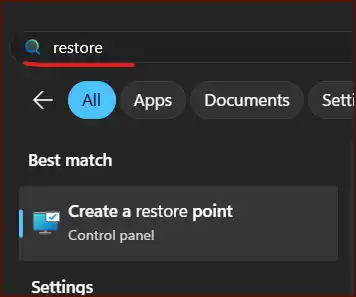
🔍 Use System Restore to Go Back in Time
If uninstalling the update doesn’t work, your next best option is to use System Restore. This feature allows you to revert your computer’s system files and settings to an earlier point in time, effectively undoing the changes that caused the instability. Windows automatically creates restore points before major events like an update.
To use System Restore:
- Open the Start Menu, type “Create a restore point”, and open the System Properties window.
- Click the System Restore… button.
- Choose a restore point that was created before the problematic update was installed.
- Follow the on-screen instructions to begin the process. Your PC will restart and be restored to its previous state. Your personal files will not be affected.
More Topics
- RTKVHD64.sys – How to Uninstall The Realtek Audio Driver
- How to Fix Windows 11 Update Installation Failures
- How to Fix Wi-Fi Connection Problems in Windows 11
- How to Fix Performance Issues and Speed Up a Slow Windows 11 PC
- How to Customize the Start Menu and Taskbar in Windows 11
- How to Reset or Perform a Fresh Start in Windows 11
- How to Create and Use a Windows 11 Recovery Drive