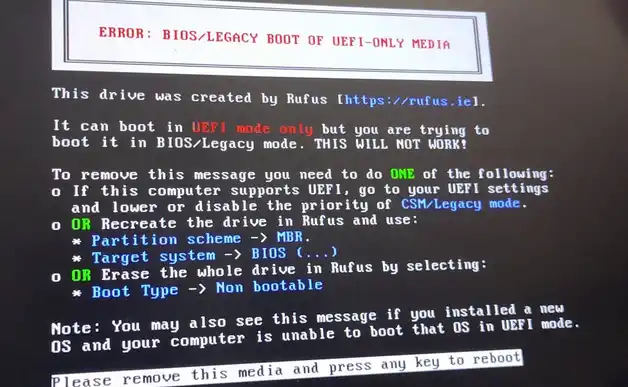
The issue you are describing, where Windows 11 boots correctly after a restart but fails with a BCD (Boot Configuration Data) error after a full shutdown (a “cold boot”), is a classic symptom of a mismatch between your system’s BIOS/UEFI settings and your Windows installation. The “BIOS/LEGACY BOOT OF UEFI-ONLY MEDIA” error in your screenshot confirms this diagnosis.
Table of Contents
This guide will walk you through the steps to correct the settings and permanently fix the boot issue.
Understanding the Core Problem: CSM vs. UEFI
Your Windows 11 is installed in UEFI mode, which is the modern standard required for features like Secure Boot. However, your motherboard’s BIOS is likely trying to boot in an older mode called CSM (Compatibility Support Module) or “Legacy” mode.
- Fast Startup (Restarts): When you restart or use Fast Startup, Windows doesn’t fully shut down. It saves its state and reloads it, bypassing the initial boot process where the BIOS conflict occurs.
- Full Shutdown (Cold Boot): When you start from a full shutdown, the BIOS takes full control of the initial boot process. If it’s set to CSM/Legacy, it fails to find the UEFI bootloader, leading to the BCD error.
The solution is to force your BIOS to use the correct UEFI mode exclusively.
Step 1: Configure Your BIOS/UEFI Settings (Primary Solution)
You need to enter your motherboard’s setup menu and disable the old compatibility mode. For your ASUS Z490 motherboard, the process is as follows:
- Enter BIOS/UEFI: Restart your computer and repeatedly press the
DelorF2key as soon as it starts up to enter the BIOS setup. - Switch to Advanced Mode: If you are in “EZ Mode,” press
F7to switch to “Advanced Mode.” - Disable CSM: Navigate to the “Boot” tab at the top of the screen. Find the setting for “CSM (Compatibility Support Module)” and set it to Disabled. Disabling this forces the motherboard to boot in UEFI mode only.
- Enable Secure Boot (Recommended): While still in the “Boot” tab, go to the “Secure Boot” menu. Ensure it is Enabled and the “OS Type” is set to “Windows UEFI mode.”
- Check Boot Priority: In the main “Boot” tab, make sure that “Windows Boot Manager” is listed as the first (#1) boot option.
- Save and Exit: Press the
F10key to save your changes and exit the BIOS. Your computer will restart.
After making these changes, perform a full shutdown (hold Shift while clicking Shut Down, or turn off the power supply for 10 seconds) and then start your computer. The issue should now be permanently resolved.
Step 2: Repair the Bootloader (If the Problem Persists)
If the BIOS changes alone don’t fix the issue, your BCD may be corrupt from the previous failed boots. You can repair it using your Windows 11 installation USB.
- Boot from your Windows 11 USB drive.
- On the first setup screen, click “Repair your computer.”
- Go to Troubleshoot > Advanced options > Command Prompt.
- In the Command Prompt, type
bootrec /rebuildbcdand press Enter. Follow the prompts to add your Windows installation to the boot list. - Restart your computer.
This should rebuild the boot configuration and allow the now-correctly-configured UEFI to find and launch Windows without issue.
More Topics
- How to Fix Slow BIOS Load Times and PC Crashing
- OneDrive – How to Use One Account on Multiple PCs With Different Storage Sizes
- Windows 11 – How to Fix an Auto-Hiding Taskbar That Won’t Reappear
- Windows 11 Security – How to Stop It From Deleting or Quarantining Files
- Windows 11 – How to Delete Update History
- Windows 11 – How to Move the Start Button to the Left and Keep Icons Centered
- Windows 11 – How to Fix a Start Menu That Cannot Be Clicked

