It’s one of the most frustrating and surprisingly common problems a Windows 11 user can face: a persistent notification prompts you to restart your computer to install important security updates. You dutifully click “Update and restart,” your system reboots, and… nothing happens. You log back in only to be greeted by the exact same “Restart required” notification, trapping you in an endless and unproductive update restart loop.
Table of Contents
- 1.1 Section 1: The Simple Fixes (Try These First)
- 1.1.1 1. Run the Windows Update Troubleshooter
- 1.1.2 2. Check Your System Time and Date
- 1.2 Section 2: The Intermediate Fix – Manually Clearing the Windows Update Cache
- 1.2.1 Why This Works
- 1.2.2 Step-by-Step Instructions (Using Command Prompt)
- 1.3 Section 3: The Advanced Fixes – System File Integrity and Manual Installs
- 1.3.1 1. Run the System File Checker (SFC) and DISM Tools
- 1.3.2 2. Manually Download and Install the Updates
This issue, where updates appear to be “Pending restart” but never actually install, is particularly common after a major system event like a crash or, in your specific case, rolling back your system to a previous restore point. This process can sometimes corrupt the Windows Update cache, leaving your system in a stuck state.
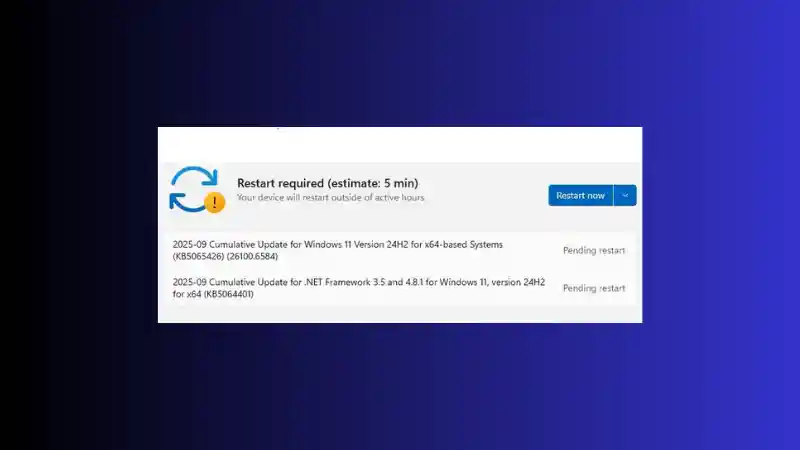
If you are facing this problem with updates like KB5065426 and KB5064401, do not worry. There are several proven methods to break this frustrating cycle and get your Windows 11 updates installed successfully. This guide will provide a comprehensive, step-by-step troubleshooting process, starting with the simplest fixes and progressing to more advanced solutions that will clear out the corruption and get your system back on track.
Section 1: The Simple Fixes (Try These First)
Before diving into more complex solutions, it’s always best to start with the simple, built-in tools that Microsoft provides.
1. Run the Windows Update Troubleshooter
This should always be your first step. The Windows Update Troubleshooter is a powerful, automated tool designed to detect and fix the most common problems with the update service. It can clear out a stuck cache, fix corrupted components, and resolve incorrect service settings.
- How to run it:
- Click the Start Menu and go to Settings.
- In the System tab, scroll down and click on Troubleshoot.
- Click on Other troubleshooters.
- You will see Windows Update at the top of the list. Click the Run button next to it.
- The troubleshooter will scan your system for several minutes. If it finds any issues, it will attempt to fix them automatically. Follow any on-screen prompts it provides.
- Once it is finished, restart your computer and then check for updates again to see if the issue is resolved.
2. Check Your System Time and Date
This may sound overly simple, but an incorrect system time and date can cause authentication errors when your computer tries to connect to Microsoft’s update servers, preventing downloads from completing correctly.
- How to check it:
- Go to Settings > Time & language > Date & time.
- Ensure that the toggle for “Set time automatically” is turned ON.
- If it was off, turn it on, restart your PC, and try updating again.
Section 2: The Intermediate Fix – Manually Clearing the Windows Update Cache
If the troubleshooter doesn’t work, the most likely culprit, especially after a system rollback, is a corrupted Windows Update cache. This is where Windows stores the temporary files for the updates it downloads. If these files are broken or incomplete, the installation will fail every time. The solution is to manually delete these files, which will force Windows to re-download a fresh, clean copy of the updates.
Why This Works
This process effectively gives the Windows Update service a fresh start. By stopping the services that use the cache, deleting the old, corrupted files, and then restarting the services, you are clearing the blockage and allowing the system to try again from scratch.
Step-by-Step Instructions (Using Command Prompt)
This process requires you to run a few commands in an elevated Command Prompt.
- Click the Start Menu and type
cmd. - Right-click on “Command Prompt” in the search results and select “Run as administrator.”
- Step 1: Stop the Necessary Services. You must first stop the Windows Update and Background Intelligent Transfer Service to unlock the cache files. Type the following two commands, pressing Enter after each one:
net stop wuauservnet stop bits - Step 2: Rename the Cache Folder. Next, you will rename the folder where the update files are stored. Renaming is safer than deleting, as it effectively creates a backup. Type the following command and press Enter:
ren C:\Windows\SoftwareDistribution SoftwareDistribution.old - Step 3: Restart the Services. Now that the old cache is gone, you can restart the services you stopped earlier. Type the following two commands, pressing Enter after each one:
net start wuauservnet start bits - You can now close the Command Prompt. Restart your computer, then go back to Settings > Windows Update and click “Check for updates.” Windows will re-download the necessary updates, and they should now install correctly.
Section 3: The Advanced Fixes – System File Integrity and Manual Installs
If you are still facing issues after clearing the cache, it’s possible that the system crash corrupted some of your core Windows files. These advanced steps can repair the operating system itself.
1. Run the System File Checker (SFC) and DISM Tools
These are powerful command-line tools that scan for and repair corrupted system files using official Microsoft sources.
- Open Command Prompt as an administrator again, as described above.
- First, run the DISM (Deployment Image Servicing and Management) tool to repair the core Windows system image. Type the following command and press Enter. This process may take some time.
DISM /Online /Cleanup-Image /RestoreHealth - Once the DISM command is complete, run the System File Checker (SFC). This tool will scan all protected system files and replace any corrupted ones. Type the following command and press Enter:
sfc /scannow - After the scan is finished, restart your computer and try the update process again.
2. Manually Download and Install the Updates
As a final resort, if the automatic update system is still failing, you can bypass it entirely by downloading and installing the updates yourself.
- Go to the official Microsoft Update Catalog website.
- In the search bar, enter the KB number of the update that is failing (e.g.,
KB5065426). - Find the correct version for your system in the search results. In your case, this would be the one labeled “2025-09 Cumulative Update for Windows 11 Version 24H2 for x64-based Systems.”
- Click the Download button and run the standalone installer file.
- Repeat the process for the second failing update (
KB5064401).
By following these steps, you should be able to break the frustrating restart loop, repair any underlying system issues, and get your PC back up-to-date and secure.
- How to Fix a Broken Windows 11 Update After Using Winreducer or Tweaking Tools
- Windows 11 – How to Fix DWM Stuttering in 23H2 (And How to Roll Back to 22H2)
- How to Fix Steam Desktop Shortcuts Not Working on Windows
- How to Disable BitLocker During Startup in Windows 11
- How to Fix Windows 11 Firewall Won’t Turn On After Update: Error 0x80070422 / 1058
- How to Fix “Can’t Drag Files to the Desktop” Using the Show Desktop Shortcut in Windows 11
- How to Fix “Can’t Change Your Username” Folder in Windows 11