When I first saw the Kernel Security Check Failure blue screen (BSOD) on my Windows 11 laptop, I thought my hardware had failed. But after some digging and trial-and-error fixes, I realized it’s often a software or driver issue that can be fixed without replacing parts. Here’s the step-by-step guide I used.
Table of Contents
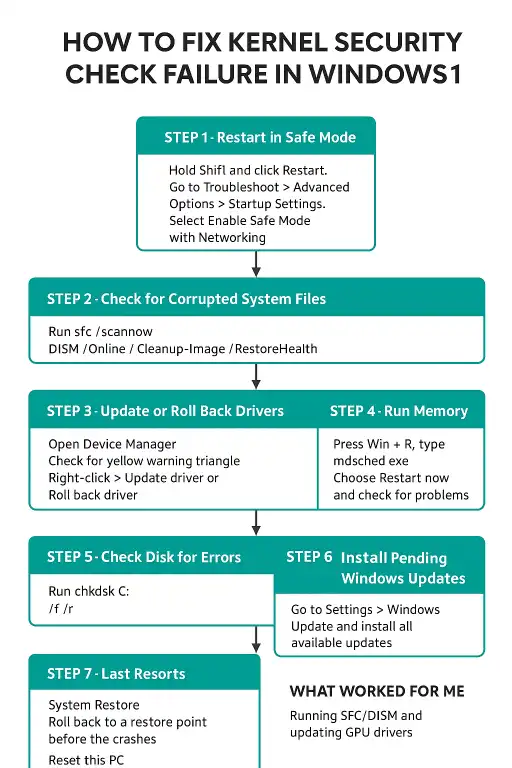
Step 1 – Restart in Safe Mode
The first thing I did was boot into Safe Mode. This allowed me to work on the system without Windows crashing repeatedly.
- Hold Shift and click Restart.
- Go to Troubleshoot > Advanced Options > Startup Settings.
- Select Enable Safe Mode with Networking.
Step 2 – Check for Corrupted System Files
I opened Command Prompt (Admin) and ran these commands one by one:

sfc /scannow
This scanned my system for corrupted files. After that, I ran:
DISM /Online /Cleanup-Image /RestoreHealth
This fixed issues SFC alone couldn’t handle.
Step 3 – Update or Roll Back Drivers
For me, the issue came from a graphics driver conflict. Here’s what worked:
- Open Device Manager.
- Check if any device has a yellow warning triangle.
- Right-click > Update driver or, if the error started after a recent update, choose Roll back driver.
I also found it helpful to uninstall drivers using DDU (Display Driver Uninstaller) in Safe Mode, then reinstall the latest version.
Step 4 – Run Memory Diagnostic
Because this error can also come from RAM issues, I ran Windows Memory Diagnostic:
- Press Win + R, type:
mdsched.exe - Choose Restart now and check for problems.
If you see errors, you may need to reseat or replace your RAM.
Step 5 – Check Disk for Errors
Sometimes disk corruption causes BSODs. I ran this command in Command Prompt:
chkdsk C: /f /r
I had to restart my PC for the scan to complete.
Step 6 – Install Pending Windows Updates
In my case, a cumulative Windows 11 update patched the issue after the fixes above. I went to Settings > Windows Update and installed everything available.
Step 7 – Last Resorts
- System Restore: I rolled back to a restore point before the crashes.
- Reset this PC: If nothing works, reinstalling Windows 11 is the final option (with or without keeping files).
Step 7 – Safe Mode
Note, if you have any difficulty getting into Windows with Driver Verifier enabled:
Start your PC, just as Windows attempts to load (spinning dots), press and hold Power Button for 5 – 10 seconds to perform a Hard Shut Down
Do this twice
On the third start Windows will boot into the Recovery Environment and from there you can access System Repair, Safe Mode, Command Prompt… etc.
Go to Troubleshoot – Advanced Option – Startup Settings and click Restart
Upon restart, press 4 to enter Safe Mode
Open Command Prompt as Administrator and run these two commands, then restart your PC.
verifier /reset
verifier /bootmode resetonbootfail
What Worked for Me
For me, the winning combo was running SFC/DISM and updating GPU drivers. After that, I haven’t seen the Kernel Security Check Failure again.
👉 If you’re interested in preventing issues like this, check my other guide on Windows 11 optimization and stability tips.
- Flyby11 – How to Install Windows 11 on Unsupported PCs
- Windows 11: How to Fix Wi-Fi and Bluetooth Issues Caused by Update
- Windows 11: Why You Can’t See Your Microsoft Account Password
- How to Fix a Video Stream That Won’t Play on Your PC (But Works on Your Phone)
- Windows 11 & 10: How to Fix Network Sharing and “Enter Network Credentials” Errors
- Windows 11 – How to Fix PIN Setup Not Working
- Windows 11 – How to Monitor Your PC’s RAM