
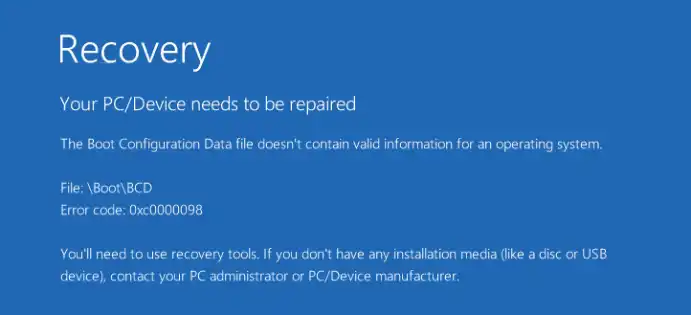
Encountering a blue screen with the error “Your device needs to be repaired” after a fresh installation of Windows 11 is a common issue, especially after manually partitioning drives. This error typically indicates that the Boot Configuration Data (BCD) is missing, corrupt, or misconfigured. This guide provides the most effective solutions to fix the problem.
Table of Contents
Solution 1: Perform a Clean Installation with Automatic Partitioning (Recommended)
The most reliable way to resolve this error and ensure a stable system is to let the Windows Installer handle all disk partitioning. This process will erase the target drive.
Warning: This method will delete all data on the installation drive. Back up any important files before proceeding.
- Boot your computer from your Windows 11 installation USB flash drive.
- Follow the setup prompts (language, time, etc.) and enter your product key if prompted.
- When you reach the “Which type of installation do you want?” screen, select “Custom: Install Windows only (advanced).”
- You will now see a list of all drives and partitions. Select and Delete every partition on the drive where you want to install Windows (e.g., “Disk 0 Partition 1”, “Disk 0 Partition 2”, etc.) until you are left with only one entry for that drive, labeled “Unallocated Space.”
- Select the single “Unallocated Space” entry.
- Click Next. Do not click “New” to create partitions manually.
- The Windows installer will now automatically create all the necessary partitions (including the required EFI system partition) and proceed with the installation. This method correctly configures the bootloader and is the most common fix for this error.
Solution 2: Repair the Bootloader Using Command Prompt (Advanced)
If you want to try and repair the existing failed installation without deleting everything, you can use the Command Prompt from the Windows Recovery Environment.
- Boot from your Windows 11 installation USB flash drive.
- On the first setup screen, click “Repair your computer” in the bottom-left corner.
- Navigate to Troubleshoot > Advanced options > Command Prompt.
- In the Command Prompt, type the following commands one by one, pressing Enter after each:
- bootrec /fixmbr
- bootrec /fixboot (If you get an “Access is denied” error, skip this command).
- bootrec /scanos
- bootrec /rebuildbcd
- When
rebuildbcdasks you to add an installation to the boot list, press ‘Y’ and then Enter. - Restart your computer and see if it boots into Windows.
Solution 3: Use Automatic Startup Repair
The built-in Startup Repair tool can sometimes resolve boot issues automatically.
- Boot from your Windows 11 installation USB drive and click “Repair your computer.”
- Navigate to Troubleshoot > Advanced options > Startup Repair.
- Let the process run. It will attempt to diagnose and fix any issues preventing Windows from starting. Restart your computer when it’s finished.
More Topics
- Windows 11 – How to Fix a Start Menu That Cannot Be Clicked
- Windows 11 Debloat Scripts – How They Can Cause Problems and Fix Them
- Windows 11 – How to Stop Your Mouse From Waking Up Your PC
- Windows 11 – How to Fix a New PC Stuck on an Update Screen
- Windows 11 – How to Fix Bold Icon Text After Unlocking
- RTKVHD64.sys – How to Uninstall The Realtek Audio Driver
- How to Fix Windows 11 Update Installation Failures