
It can be alarming when Windows 11 Security (also known as Microsoft Defender) begins to aggressively delete or quarantine files that you believe are safe. This behavior, known as a “false positive,” often happens after a fresh Windows installation when security settings are at their most sensitive.
Table of Contents
This guide will show you how to review the files that have been “isolated” (quarantined), how to restore them, and how to prevent Windows Security from flagging them in the future.
Important Warning: Only perform these actions on files and applications that you are 100% certain are safe and from a trusted source. If you have any doubt, do not restore or exclude the file.
Step 1: Find and Restore Your Quarantined Files
First, you need to see exactly what Windows Security has taken action on. These files are not permanently deleted but are moved to a secure quarantine location.
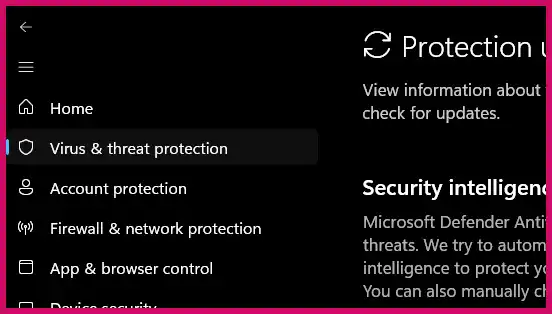
- Open your Start Menu and type “Windows Security,” then open the app.
- Click on “Virus & threat protection.”
- Under the “Current threats” section, click on “Protection history.”
- You will see a list of recent actions. Click the “Filters” button and select “Quarantined items” to easily find the files that have been moved.
- Click on a specific threat that you want to review. You will see the name of the threat, the date it was found, and the path to the affected file.
- Click the “Actions” dropdown menu on the bottom right and select “Restore.” This will move the file from quarantine back to its original location.
Step 2: Prevent Future Deletions by Adding an Exclusion
To stop Windows Security from flagging the same safe file or application again, you need to add an “exclusion.” This tells the antivirus to ignore that specific file, folder, or process during its scans.
- In the Windows Security app, go to “Virus & threat protection.”
- Under “Virus & threat protection settings,” click on “Manage settings.”
- Scroll down to the bottom to find the “Exclusions” section and click on “Add or remove exclusions.”
- Click the “+ Add an exclusion” button and choose what you want to exclude:
- File: Select a single file (e.g.,
program.exe) that you know is safe. - Folder: This is the most common option. Select an entire folder (e.g., a game’s installation directory or a folder with your project files) to exclude it and everything inside it from scans.
- File type: Exclude all files with a specific extension (e.g.,
.py). Use this with caution. - Process: Exclude a running process by its name (e.g.,
program.exe). This is an advanced option.
- File: Select a single file (e.g.,
- Browse to the file or folder you want to exclude and select it. Confirm the action when prompted.
After adding the exclusion, Windows Security will no longer scan or take action on that specific item.
A Word of Caution: Is the File Actually Safe?
If a file is repeatedly being flagged, it’s worth double-checking that it is not a genuine threat. If you are unsure, you can use an online tool like VirusTotal.com. This free service will scan your file with dozens of different antivirus engines, giving you a comprehensive second opinion on its safety.
More Topics
- How to Fix Slow BIOS Load Times and PC Crashing
- OneDrive – How to Use One Account on Multiple PCs With Different Storage Sizes
- Windows 11 – How to Fix an Auto-Hiding Taskbar That Won’t Reappear
- Windows 11 – How to Delete Update History
- How to Fix Windows 11 Boot Failure and BCD Errors After a Full Shutdown
- Windows 11 – How to Move the Start Button to the Left and Keep Icons Centered
- Windows 11 – How to Fix a Start Menu That Cannot Be Clicked